Wednesday, October 6, 2010

CREATE Board

I found this board at Ikea. It was a piece of shelving that they were selling in their miscellaneous stuff section. I liked the size of it and bought it with no idea what I was going to use it for. Then it got stuck behind my couch and I completely forgot about it. Until the other day. I was cleaning and found my dear old shelving piece and decided it was high time that I did something with it.
First thing I did was spray paint it this turquoise color. It's Krylon, I think New Ocean Breeze, or something like that.
Then I whipped out my cricut and cut about a million of these little flowers out of white vinyl. Ok, I may be exaggerating a little bit, but seriously, there were a ton of little flowers. The cartridge was the original that came with my machine. I think it is George and Basic Shapes.
And then I lined them up on my board where I thought they would look cute.
And peeled off the backing and began sticking them onto my board.
I wanted it to have a little something extra so I also cut the word CREATE out with my cricut and put that at the end of the board. When everything was finally stuck down I went over it with a thin layer of gloss mod podge to help seal everything down.
It had an ugly edging because it was meant to be a shelf, so I used some white 7/8" grosgrain ribbon and hot glued it around the edge.
And then folded the top over and hot glued it down.
When that was all done I used my Mod Podge Dimensional Magic and outlined each flower and then left it to dry overnight.
And now I have a fun little inspirational piece to hang out on my desk to help keep things pretty.
I think that I may actually end up using this for something else because I love it and I feel bad that it's stuck in my laundry room/office all day long. We'll see...

Monday, October 4, 2010

Gathered Loopy Scarf

I've been seeing elastic thread all over the place lately and I really wanted to find a project to try it out.  After much debate I decided that I wanted to make myself a scarf. I love scarves. I have about a billion of them, and I could have a billion more and still be wanting. This one is really fun and can be worn loose in the summer or can be wrapped tighter in the winter. I love it!

To make this scarf, I started with some plain white knit fabric


And cut a strip 14 inches wide. It was probably about 5 ft long, though I didn't measure, you can make it as long or as short as you want.


I used the Dritz brand elastic thread. I was about $1.50 a spool and can be found with the elastic at Joann's.


Hand thread the bobbin with the elastic thread and use plain thread on the top of your sewing machine. I used a straight stitch at a 2 1/2 length and set the tension on my machine to the highest setting possible. Starting at the bottom of my scarf, I started sewing an S shape through the length of the scarf.


And sewed clear from one end of the scarf to the other.


Next I folded it in half hotdog way, right sides together, and sewed along the edge.


And flipped the scarf right side out.


Next I took the two ends and sewed them together.


And that's it. Super easy and way fun. I love this plain but just think of all of the different fabric options and colors and patterns you could do!


Friday, October 1, 2010

Flip- Flop Friday with Sumo's Sweet Stuff


Hello everyone!

I'm so excited to be blog swapping with Ruth and Sammy today! Aren't they fantastic? I hope you'll go check out the great tutorial that they are sharing on my blog today; I can't wait to try it!

I'm Sumo, from Sumo's Sweet Stuff!


Sumo's Sweet Stuff

My real name is Summer, but my husband nicknamed me Sumo when we were dating. (Should I be offended?) Now he's got all of my family, as well as lots of our friends, calling me Sumo. I think Aunt Sumo sounds pretty great, don't you? I live in Utah with my husband, and our two beautiful daughters - Reece & Remi!


Growing up, I never used to be all that domestic or crafty, so I think no one is more surprised than my mom at how I've ended up where I am today! I started Sumo's Sweet Stuff last May as a place to keep some of my crafting projects so that my personal blog wasn't overrun with them. Somehow, that developed into a place to host giveaways, share tutorials, share recipes, and feature fellow bloggers' ideas and blogs! I also use my blog to promote my etsy shop, so if you're ever in the market for some baby girl accessories, come on over! Every Monday is Market Yourself Monday, where you can link up your latest projects, and visit other blogs to get some inspiration!
Sumo Sweet Stuff


Here's a little peek at some of the things you can find on my blog:


I'm going to share a little tutorial with you today! I got this baby at Old Navy a few weeks ago (are you loving the gray and yellow trend as much as I am right now??) and I just knew that it couldn't be hard to re-create!


What you'll need:

- shirt/onesie
- lace
- matching fabric
- heat and bond (optional)
- sewing machine/accessories
- template


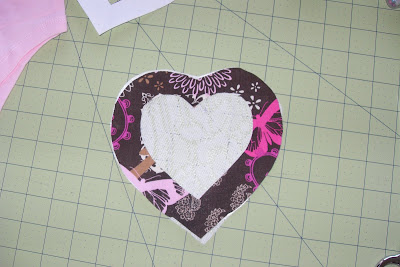
I started out by tracing my heart on to my fabric and cutting it out.


Then I traced it on to some heat and bond and ironed it on. I just did heat and bond to give it a little added security on the shirt, but you would be just fine to skip this step. Either way, you're going to be sewing it down!


Next, I traced the middle part of the heart on to the paper backing of the heat and bond.


Cut it out.


Then it was time to cut out a heart of lace.


This is what we have so far. It's okay if your heart and lace aren't cut out exactly the same size. I like the way it looks with it being kind of 'off' instead of totally proportional and perfect. Fun and funky!


Then I distressed the edges a little bit and made a couple of holes in the heart to give it some character. Washing it will also help with the distressing.


Lay your lace and fabric on the shirt where you want them and iron them down (if you did the heat and bond). The heat and bond catches the lace, which is kind of nice.


Then stitch around the heart - a fun color of thread that will pop is fun - and you are done!


Here's another shirt I made for my other daughter.


All that's left to do is put it on one of the cutest girls you can find and have a little photo shoot!


Easy, right?

You can find something every day of the week at Sumo's Sweet Stuff:

Market Yourself Monday
Tutorial Tuesday
Mouth-Watering Wednesday
Things to Try Thursday
Feature Friday
Showcase Saturday
Sponsor Sunday

Thanks again for having me, ladies! I hope to see you all over at Sumo's Sweet Stuff soon!

 
Simply Yours Designs: Cute Blog Designs