Monday, September 27, 2010

Super Delicious Maple Butter Blondies


If you ever go to Applebees, you must try the Maple Butter Blondies. They are so incredibly delicious and will cause you to eat so much that you may or may not need to unbutton your pants to be comfortable, or to possibly make room for another Maple Butter Blondie. They are that good.

Well, a couple of months ago Food Network Magazine came out with a copy-cat recipe for this fabulous treat and it tastes just as good as the original. It has become my job when my family gets together at my mom's to make the Blondies. It is a blessing... and a curse. I've created some Maple Butter Blondie addicts, and it is a hard and tasty habit to kick, and I honestly don't think that they are trying very hard to do it. So tonight I will be making another batch of goodness and passing this burden on to you, so that you too may have some addicts in your homes. I mean, seriously, where did they find these things? Heaven?

Almost-Famous Maple-Butter Blondies

Ingredients

For the Blondies:
10 tablespoons unsalted butter, at room temperature,
plus more for the pan
1 cup walnut pieces
2 cups all-purpose flour
1 teaspoon baking powder
1/2 teaspoon baking soda
1 teaspoon salt
1 1/2 cups packed light brown sugar
3 large eggs
2 tablespoons vanilla extract
6 ounces white chocolate, cut into chunks

For the Topping:
1/3 cup maple syrup
6 tablespoons unsalted butter
1/4 cup heavy cream
Vanilla ice cream, for serving
1/2 cup walnut pieces

Directions
Make the blondies: Preheat the oven to 350 degrees F. Line a 9-by-13-inch baking pan with foil, leaving an overhang on two sides; butter the foil. Pulse 1/2 cup walnuts in a food processor until almost fine (do not overprocess). Whisk the ground nuts, flour, baking powder, baking soda and salt in a medium bowl.

Beat 10 tablespoons butter and the brown sugar with a mixer on medium speed until fluffy, about 2 minutes. Beat in the eggs, one at a time, scraping down the bowl with a rubber spatula. Beat in the vanilla. Gradually beat in the dry ingredients until just combined. Fold in the white chocolate and the remaining 1/2 cup walnuts.

Spread the batter in the prepared pan and bake until the blondies are light brown around the edges and spring back when pressed, about 30 minutes. Cool slightly on a rack.

Meanwhile, make the topping: Place the maple syrup and butter in a small saucepan over medium heat and cook until the mixture bubbles and thickens, swirling the pan, about 6 minutes. Add the cream and continue to cook until the mixture is the consistency of caramel.

Use the foil to lift the blondies out of the pan, then cut into large bars. Serve warm topped with ice cream, the maple-butter sauce and the walnuts.


Original recipe can be found here.

Friday, September 24, 2010

Flip- Flop Friday with Fireflies and Jellybeans

Hello Scraps and String readers!! I am so excited to be sharing this fun project with you all today!
Let me introduce myself!
I am Fawnda from Fireflies and Jellybeans a little DIY blog that I co-author with my best friend Jeannine.
I am a mom to a 2 year old son (who we adopted from Korea about 1.5 years ago!) and a wife to an amazing man! I love all things crafty!

Here is somehting that every mom needs!   A travel 1st aid kit!
I love my travel first aid kit! I love that it fits in my purse, that it has all the stuff that I need.  I that love that weven though I am clumsy I can still look good! You can make your own!
Here is what you need:
2 kids of fabric (1 Fat quarter of each should be enough)
Fusible fleece
Elastic (1 used 1 inch thick)
Elastic cord or elastic hair bands
Buttons
Zipper
Sewing machine (with thread, scissors etc...)
1. Cut out your fabric.
2 pieces 17" X 6" for the backing
1 piece of each: 6" X 9" , 3.5'' X 9", for the pockets
1 piece of 4" X 4" for the flap for the pocket (not pictured)
2. Cut out your pieces of fusible fleece. (I like to cut mine a little smaller to give me room for seams. I cut mine to be 16 X 5.) Iron it on to the WRONG side of your two backing pieces. This is to give it strength and cushion.
3. Iron all your pocket and flap pieces in half WRONG sides together so that you have these rectangles:
6 X 4.5
3.5 X 4.5
4 X 2
4. Sew down the tow sides of each pocket and flap. Leave the bottom open to flip right-side-out.
(Flap not pictured again... it is a little shy!)
5. Now we are going to attach the zipper pocket. This is the first zipper pocket that I have done. So, there may be an easier way to do it but this is how I did it.
First I measure and marked where the end of my pocket was on the zipper. I used the 6" side of the pocket. I marked the zipper with a pin.
6. Sew 5-10 whip stitches at your mark to make a new end to your zipper.
7. Cut off the extra part of the zipper
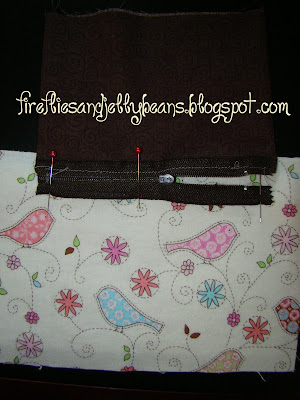
8. Put your zipper foot on your sewing machine and sew the RIGHT side of your pocket to the TOP side of your zipper.
8. Now, place you pocket (with the zipper) on one side of your backing where you want it to be placed. You want to make sure that it is at least an inch from the end.
9.Now flip the pocket up (So now the WRONG side is facing up) and pin the zipper in place.
10. Sew the zipper on.

11. Flip your pocket back down and sew down the sides to the backing. You can leave the bottom open. We will finish that off later.
12. Now measure 4 inches away from your zipper pocket and place you 3.5 X4.5 pocket on your backing and pin in place.
13. Sew down the 2 sides of your pocket. Leave the bottom open, we will finish that later too.
14. Now place your flap over your little pocket and pin in place. the flap should reach the top of your backing. You do not need to sew it on yet we will sew it when we put the other backing side on.
15. Cut a piece of elastic to be about 4.5 - 5 inches long. I made mine 5 inches and it was a little too long, so I would suggest 4.5 inches.
16. Fold over one end of the elastic and sew it the back at the edge of one of your pockets in the middle.
17. Repeat on the other side, so that it looks like this.
18. Sew a vertical line in the middle, there should be some slack in the elastic, so that it looks like this:
19. Make 2 loops out of your elastic cord (or you can use an elastic hair binder) and pin then to the 6 inch side of your backing (on the side opposite of the zipper pocket.)
20. Place you other backing piece over the one with the pockets with RIGHT sides together and pin all the way around.
I like to mark my opening with double pins so that I know where to stop sewing.
21. Sew around the outside edges of your rectangle leaving a 3-4 inch opening to flip right-side-out. I use a 1/2 seam allowance. Make sure you get all the pockets in the seams because this is how we are finishing those edges.
22. Cut off the corners.
23. Flip right side out and make sure your corners are all pushed out. I like to use a knitting needle to help get nice corner. (your pockets should all be finished in the seams now) Flip your unfinished edges of your opening inside and iron your seams.
24. Top sew all the way around the rectanlge (closing your opening.)
25. I added some top stitching were the folds of the kit are to make it easy to "crease" closed. I used the pockets as my guides and top stiched from the top to the bottom. This is optional.
26. Fold your kit closed, pull on your loops and mark where your button should go.
27. Hand sew on your buttons. I had to go inside of my pocket for mine.
28. Fill it up with all your first aid needs:
The small pocket is for bandages and cleansing wipes. The elastic straps are to hold the antiseptic and Children's Tylenol. The zipper pocket for bigger bandages, tweezers, and suckers (nothing heals a boo-boo faster than a sucker!).
We would love it if you would stop by Fireflies and Jellybeans! We love making new friends!
Thank you Ruth and Sammy for having me!  It was SO FUN! 

Wednesday, September 22, 2010

The Boys of Fall

My latest project. We are in full swing with football season here in my little town. That means every Friday night you can find the boys and I up in the stands cheering on our team while my husband lends his hand down on the field with the rest of the coaches. I thought that the jerseys were neccessary Finn & Big D absolutely love them. They're ready to get out on the field themselves!!

 
Simply Yours Designs: Cute Blog Designs