

Hello everyone!
I'm so excited to be blog swapping with Ruth and Sammy today! Aren't they fantastic? I hope you'll go check out the great tutorial that they are sharing on my blog today; I can't wait to try it!
I'm Sumo, from Sumo's Sweet Stuff!


My real name is Summer, but my husband nicknamed me Sumo when we were dating. (Should I be offended?) Now he's got all of my family, as well as lots of our friends, calling me Sumo. I think Aunt Sumo sounds pretty great, don't you? I live in Utah with my husband, and our two beautiful daughters - Reece & Remi!

Growing up, I never used to be all that domestic or crafty, so I think no one is more surprised than my mom at how I've ended up where I am today! I started Sumo's Sweet Stuff last May as a place to keep some of my crafting projects so that my personal blog wasn't overrun with them. Somehow, that developed into a place to host giveaways, share tutorials, share recipes, and feature fellow bloggers' ideas and blogs! I also use my blog to promote my etsy shop, so if you're ever in the market for some baby girl accessories, come on over! Every Monday is Market Yourself Monday, where you can link up your latest projects, and visit other blogs to get some inspiration!

Here's a little peek at some of the things you can find on my blog:


I'm going to share a little tutorial with you today! I got this baby at Old Navy a few weeks ago (are you loving the gray and yellow trend as much as I am right now??) and I just knew that it couldn't be hard to re-create!

What you'll need:
- shirt/onesie
- lace
- matching fabric
- heat and bond (optional)
- sewing machine/accessories
- template

I started out by tracing my heart on to my fabric and cutting it out.

Then I traced it on to some heat and bond and ironed it on. I just did heat and bond to give it a little added security on the shirt, but you would be just fine to skip this step. Either way, you're going to be sewing it down!

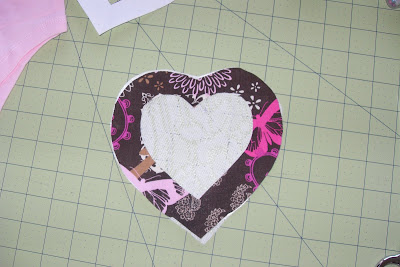
Next, I traced the middle part of the heart on to the paper backing of the heat and bond.

Cut it out.

Then it was time to cut out a heart of lace.

This is what we have so far. It's okay if your heart and lace aren't cut out exactly the same size. I like the way it looks with it being kind of 'off' instead of totally proportional and perfect. Fun and funky!
Then I distressed the edges a little bit and made a couple of holes in the heart to give it some character. Washing it will also help with the distressing.

Lay your lace and fabric on the shirt where you want them and iron them down (if you did the heat and bond). The heat and bond catches the lace, which is kind of nice.

Then stitch around the heart - a fun color of thread that will pop is fun - and you are done!

Here's another shirt I made for my other daughter.

All that's left to do is put it on one of the cutest girls you can find and have a little photo shoot!


Easy, right?
You can find something every day of the week at Sumo's Sweet Stuff:
Market Yourself Monday
Tutorial Tuesday
Mouth-Watering Wednesday
Things to Try Thursday
Feature Friday
Showcase Saturday
Sponsor Sunday
Thanks again for having me, ladies! I hope to see you all over at Sumo's Sweet Stuff soon!


0 comments:
Post a Comment